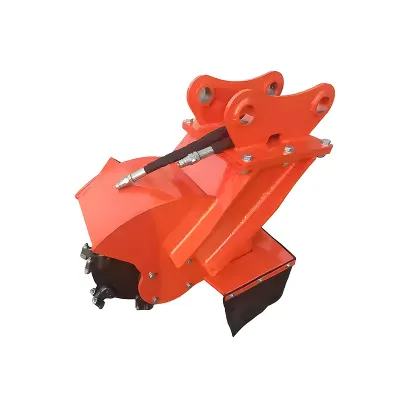
Mounting a stump grinder to a skid steer turns a standard machine into a dedicated stump-removal tool. Unlike walk-behind or self-propelled grinders that require a separate operator and transport, a skid steer attachment uses the machine's lift, tilt, and auxiliary hydraulics to position the cutting wheel precisely and grind stumps below grade. This guide walks through the full workflow — from site prep to final cleanup — with practical techniques for safe, efficient results.
Whether you're a landscaper adding stump removal to your service menu, a tree care professional grinding stumps after removals, or a contractor clearing a building site, the principles here apply across most skid steer brands and grinder models. Good technique reduces wear on the attachment, extends tooth life, and keeps the job site safe for everyone nearby.
Pre-Job Preparation and Site Assessment
Before you mount the grinder, take time to assess the site and each stump. Measure the stump diameter at ground level, note the wood species, and check for rot or hollow spots — these affect how the stump grinds. Hard, dense woods like oak, hickory, and maple need slower feed rates and more passes; softer woods like pine, poplar, and cedar grind faster. Older, weathered stumps may be softer but often contain embedded rocks, fence wire, or nails.
Clear the area around each stump of rocks, loose debris, wire, fencing, and anything that could be thrown by the cutting wheel or damage the carbide teeth. Mark underground utilities, pipes, cables, and septic systems before you start. Confirm the stump isn't directly over a utility line. Set up a safe work zone with barriers or cones to keep bystanders at least 15 meters away from the operating area. Check the ground for stability and slope — the skid steer needs firm footing and enough maneuvering room around each stump.
Mounting the Attachment and Verifying Hydraulics
Mount the stump grinder to the skid steer using the universal quick-attach system. Align the plate with the attachment's mounting frame, tilt the plate forward to engage the lower hooks, and secure the locking pins or levers. Once mounted, connect the hydraulic hoses to the skid steer's auxiliary couplers — make sure the fittings are clean and seated fully. Check that the hoses have enough slack for full boom movement without pinching, stretching, or rubbing against the cutting wheel.
Before you start grinding, verify that your skid steer's auxiliary flow meets or exceeds the stump grinder's minimum requirement. The TGEC skid steer stump grinder needs 60 L/min flow and 16 MPa operating pressure, so confirm your machine hits those numbers. If you're unsure about your machine's hydraulic output, the standard vs. high flow stump grinder guide explains how to check and interpret those ratings. Start the engine, engage the auxiliary circuit, and cycle the attachment briefly to confirm correct motor rotation and check for hydraulic leaks at all fittings.
Grinding Technique: Step by Step
Position the skid steer so the cutting wheel is centered over the stump, approaching from the side rather than head-on. Lower the wheel until it just touches the top of the stump, then engage the auxiliary hydraulics to bring it up to operating speed. Start grinding from the outer edges of the stump, working inward in a sweeping motion. Use the boom lift and bucket tilt to control depth and angle — make shallow passes rather than forcing the wheel deep into the wood in one go.
As you grind, the wheel will throw a spray of wood chips and mulch. Adjust your position periodically to keep the mulch from piling up against the stump, which can block your view of the cutting area. Work from the top down, raising the wheel occasionally to clear accumulated mulch and check your progress. When the stump is ground down to about ground level, start making deeper passes to remove the root crown and upper roots below grade. A typical target depth is 200 to 300 mm below ground level, depending on whether the area will be paved, seeded, or landscaped.
Listen to the hydraulic motor and cutting wheel as you work. A steady, consistent sound means proper cutting; a high-pitched whine or sudden drop in wheel speed tells you you're feeding too aggressively. Ease off the downforce, let the wheel regain speed, then resume with a shallower cut. If the wheel stalls completely, disengage the auxiliary hydraulics right away, raise the attachment, and clear any wood jammed between the teeth before restarting. For operators comparing different attachment options, the best skid steer stump grinder selection guide covers how cutting width, tooth design, and hydraulic matching affect grinding productivity.
Safety Considerations
Stump grinding throws wood chips, dust, and occasional debris — so personal protective equipment isn't optional. Operators should wear safety glasses or a face shield, hearing protection, work gloves, steel-toed boots, and close-fitting clothing that won't catch on moving parts. Make sure the skid steer's cab windows or screens are in good shape, and never operate the attachment with the cab door open or the roll bar unfastened.
Never let bystanders into the work zone while the cutting wheel is spinning. Wood chips and debris can be thrown 15 meters or more, and a broken carbide tooth can travel even farther. If you need to leave the operator's seat for any reason, disengage the auxiliary hydraulics, lower the attachment to the ground, shut off the engine, and remove the key. Never clear jammed wood or inspect the cutting wheel while the attachment is spinning or the engine is running — always let the wheel come to a complete stop before getting near it.
Post-Grinding Cleanup and Site Restoration
Once the stump is ground to the desired depth, use the skid steer's bucket or a separate attachment to clear the accumulated wood mulch from the hole. The mulch can be stockpiled for landscape ground cover, composted, or disposed of according to local regulations. Inspect the hole for remaining root fragments, rocks, or debris, and remove any large pieces that could interfere with subsequent grading or landscaping.
Fill the hole with topsoil, compost, or a soil-sand mix, depending on the intended use. For lawn restoration, grade the fill slightly above the surrounding ground level to account for settling, then seed and mulch. For construction sites, compact the fill in lifts to meet engineering specs. If you've removed multiple stumps, document each location and depth for the property owner or general contractor. Finally, inspect the stump grinder for damage, clean the cutting wheel and frame, and perform any required maintenance before storing the attachment or moving to the next job.
Maintenance Between Jobs
After each use, inspect the carbide cutting teeth for wear, chipping, or missing carbide tips. replace damaged teeth promptly — a broken tooth creates uneven loading on the cutting wheel and can cause vibration that damages bearings and the hydraulic motor. Check hydraulic hoses for abrasion, cuts, or leaks, and make sure all fittings remain tight. Grease the mounting frame pins and bushings according to the manufacturer's schedule, and inspect the quick-attach plate for wear or cracking.
Periodically check the hydraulic motor for signs of leakage around the output shaft, and monitor the skid steer's hydraulic fluid temperature during operation. Excessive heat may indicate a flow mismatch, restricted return line, or internal motor wear. Store the attachment in a dry, covered area when not in use, and consider applying a rust inhibitor to the cutting wheel and frame if storage will exceed a few weeks. Following these maintenance practices extends the service life of the attachment and ensures reliable performance on every job.
For contractors and equipment buyers seeking a reliable stump grinder for skid steer applications, the full skid steer stump grinder attachments range from TGEC includes standard-flow configurations with documented specifications, genuine replacement parts, and OEM supply options for dealers and distributors.